هنگام ارسال request ها به سرور web API خود، امکان دارد در پاسخ با خطا مواجه شویم. بنابراین، استفاده از مدیریت خطای Angular برای رسیدگی به این خطاها در هنگام ارسال درخواستهای HTTP ضروری است. این دقیقاً همان کاری است که ما در این پست می خواهیم انجام دهیم. اگر خطای 404 یا 500 را دریافت کنیم، کاربر را به صفحه خاصی هدایت می کنیم. برای سایر خطاها، ما یک پیام خطا را به صورت یک modal نشان می دهیم. صفحه ای که خطای 404 را handle می کند قبلاً ایجاد شده است، بنابراین، اجازه دهید با ایجاد یک component 500 (Internal server error) به کار خود ادامه دهیم.
اگر می خواهید تمام آموزشهای لازم و پایه مربوط به آموزش گام به گام Angular را ببینید ، لطفاً روی این لینک کلیک کنید: مقدمه آموزش گام به گام Angular.
ایجاد Internal Server Error Component
در پوشه error-pages با تایپ دستور AngularCLI یک component جدید ایجاد می کنیم:
|
1 |
ng g component error-pages/internal-server --skip-tests |
سپس، اجازه دهید internal-server.component.ts را به این صورت تغییر دهیم:
|
1 2 3 4 5 6 7 8 9 10 11 12 13 14 15 16 |
import { Component, OnInit } from '@angular/core'; @Component({ selector: 'app-internal-server', templateUrl: './internal-server.component.html', styleUrls: ['./internal-server.component.css'] }) export class InternalServerComponent implements OnInit { errorMessage: string = "500 SERVER ERROR, CONTACT ADMINISTRATOR!!!!"; constructor() { } ngOnInit(): void { } } |
سپس فایل internal-server.component.html را تغییر میدهیم:
|
1 |
<p> {{errorMessage}} </p> |
علاوه بر این، ما فایل internal-server.component.css را نیز به این صورت اصلاح می کنیم:
|
1 2 3 4 5 6 |
p{ font-weight: bold; font-size: 50px; text-align: center; color: #c72d2d; } |
در نهایت، آرایه routes را در فایل app-routing.module.ts تغییر میدهیم:
|
1 2 3 4 5 6 7 8 |
const routes: Routes = [ { path: 'home', component: HomeComponent }, { path: 'owner', loadChildren: () => import('./owner/owner.module').then(m => m.OwnerModule) }, { path: '404', component: NotFoundComponent }, { path: '500', component: InternalServerComponent }, { path: '', redirectTo: '/home', pathMatch: 'full' }, { path: '**', redirectTo: '/404', pathMatch: 'full' } ]; |
تمام.
ما component خود را ایجاد کردهایم و زمان آن رسیده است که یک service برای رسیدگی به خطا ایجاد کنیم.
ایجاد یک Service برای مدیریت خطای Angular
در پوشه shared/services، میخواهیم یک service جدید ایجاد کنیم و نام آن را Error-handler بگذاریم:
|
1 |
ng g service shared/services/error-handler --skip-tests |
سپس، فایل error-handler.service.ts را به این صورت اصلاح میکنیم:
|
1 2 3 4 5 6 7 8 9 10 11 12 13 14 15 16 17 18 19 20 21 22 23 24 25 26 27 28 29 30 31 32 33 34 35 36 37 38 39 40 41 |
import { HttpErrorResponse } from '@angular/common/http'; import { Injectable } from '@angular/core'; import { Router } from '@angular/router'; @Injectable({ providedIn: 'root' }) export class ErrorHandlerService { public errorMessage: string = ''; constructor(private router: Router) { } public handleError = (error: HttpErrorResponse) => { if (error.status === 500) { this.handle500Error(error); } else if (error.status === 404) { this.handle404Error(error) } else { this.handleOtherError(error); } } private handle500Error = (error: HttpErrorResponse) => { this.createErrorMessage(error); this.router.navigate(['/500']); } private handle404Error = (error: HttpErrorResponse) => { this.createErrorMessage(error); this.router.navigate(['/404']); } private handleOtherError = (error: HttpErrorResponse) => { this.createErrorMessage(error); //TODO: this will be fixed later; } private createErrorMessage = (error: HttpErrorResponse) => { this.errorMessage = error.error ? error.error : error.statusText; } } |
اینجا ابتدا Router را inject می کنیم که از آن در کد برای هدایت کاربر به صفحات دیگر استفاده می کنیم. در تابع ()handleError، کد وضعیت خطا را بررسی می کنیم و بر اساس آن متد private مناسب را برای رسیدگی به آن خطا فراخوانی می کنیم. توابع ()handle404Error و ()handle500Error مسئول set کردن ویژگی errorMessage هستند. ما قصد داریم از این ویژگی به عنوان یک پیام خطای modal یا یک پیام در صفحه خطا استفاده کنیم. ما بعداً با تابع ()handleOtherError همانطور که در comment جلوی آن نیز گفته شده است سروکار خواهیم داشت. اگر فایل owner-list.component.ts را به خاطر بیاورید، ما در آنجا، در حال گرفتن تمام owner ها از server هستیم. اما در آن فایل، مدیریت خطایی وجود ندارد. پس با تغییر فایل owner-list.component.ts، برای اجرای عملکرد مدیریت خطای Angular، به کار خود ادامه میدهیم:
|
1 2 3 4 5 6 7 8 9 10 11 12 13 14 15 16 17 18 19 20 21 22 23 24 25 26 27 28 29 30 31 32 33 34 35 |
import { Component, OnInit } from '@angular/core'; import { Owner } from './../../_interfaces/owner.model'; import { OwnerRepositoryService } from './../../shared/services/owner-repository.service'; import { ErrorHandlerService } from './../../shared/services/error-handler.service'; import { HttpErrorResponse } from '@angular/common/http'; @Component({ selector: 'app-owner-list', templateUrl: './owner-list.component.html', styleUrls: ['./owner-list.component.css'] }) export class OwnerListComponent implements OnInit { owners: Owner[]; errorMessage: string = ''; constructor(private repository: OwnerRepositoryService, private errorHandler: ErrorHandlerService) { } ngOnInit(): void { this.getAllOwners(); } private getAllOwners = () => { const apiAddress: string = 'api/owner'; this.repository.getOwners(apiAddress) .subscribe({ next: (own: Owner[]) => this.owners = own, error: (err: HttpErrorResponse) => { this.errorHandler.handleError(err); this.errorMessage = this.errorHandler.errorMessage; } }) } } |
تمام. باید توجه داشته باشیم که اکنون، اینجا یک آبجکت JSON را در داخل تابع subscribe داریم ارسال می کنیم. در صورت موفقیت آمیز بودن response، ویژگی next فعال خواهد شد و ویژگی error نیز error response را مدیریت می کند.
ما می توانیم با تغییر کد در متد GetAllOwners در سرور، آن را امتحان کنیم. به این منظور، فقط کافیست در خط اول، return NotFound() یا return StatusCode(500, “Some message”) را اضافه کنیم که در اینصورت، مطمئناً به صفحه خطای درست redirect خواهیم شد.
آماده سازی Owner-Details Component
کار خود را با ایجاد owner-details component ادامه میدهیم:
|
1 |
ng g component owner/owner-details --skip-tests |
برای فعال کردن routing به این component، باید فایل owner-routing.module.ts را به این صورت تغییر دهیم:
|
1 2 3 4 |
const routes: Routes = [ { path: 'list', component: OwnerListComponent }, { path: 'details/:id', component: OwnerDetailsComponent } ]; |
همانطور که می بینید، این مسیر جدید دارای پارامتر id است. بنابراین وقتی روی دکمه Details کلیک می کنیم، این id را به مسیر خود منتقل می کنیم و owner مورد نظر را دقیقا با همین id در کامپوننت OwnerDetails دریافت می کنیم.
اما برای اینکه بتوانیم این کار را انجام دهیم، باید یک رابط جدید به پوشه interfaces_ اضافه کنیم:
|
1 2 3 4 5 6 |
export interface Account{ id: string; dateCreated: Date; accountType: string; ownerId?: string; } |
و اینترفیس Owner را اصلاح میکنیم:
|
1 2 3 4 5 6 7 8 9 |
import { Account } from './account.model'; export interface Owner{ id: string; name: string; dateOfBirth: Date; address: string; accounts?: Account[]; } |
با استفاده از علامت سوال، property خود را اختیاری می کنیم.
برای ادامه، اجازه دهید فایل owner-list.component.html را تغییر دهیم:
|
1 2 |
<td><button type="button" id="details" class="btn btn-primary" (click)="getOwnerDetails(owner.id)">Details</button></td> |
در رویداد کلیک، تابع getOwnerDetails را فراخوانی می کنیم و owner id را به عنوان پارامتر ارسال می کنیم. بنابراین باید این رویداد کلیک را در فایل owner-list.component.ts مدیریت کنیم.
ابتدا، یک عبارت import اضافه میکنیم:
|
1 |
import { Router } from '@angular/router'; |
سپس، ما می خواهیم سازنده را تغییر داده تا router را اضافه کنیم:
|
1 2 |
constructor(private repository: OwnerRepositoryService, private errorHandler: ErrorHandlerService, private router: Router) { } |
و تابع getOwnerDetails(id) را اضافه میکنیم:
|
1 2 3 4 |
public getOwnerDetails = (id) => { const detailsUrl: string = `/owner/details/${id}`; this.router.navigate([detailsUrl]); } |
ما اینجا، یک URI برای کامپوننت details خود با پارامتر id ایجاد کردیم و سپس تابع navigate را فراخوانی کرده تا به آن کامپوننت navigate کنیم.
در نهایت، فقط یک تابع دیگر برای دریافت یک owner واحد در داخل فایل owner-repository.service.ts اضافه میکنیم:
|
1 2 3 |
public getOwner = (route: string) => { return this.http.get<Owner>(this.createCompleteRoute(route, this.envUrl.urlAddress)); } |
پیاده سازی Owner-Details Component
ما در حال حاضر، تمام کدها را برای پشتیبانی از کامپوننت owner-details داریم. اکنون زمان پیاده سازی business logic در داخل این component است.
ابتدا فایل owner-details.component.ts را اصلاح میکنیم:
|
1 2 3 4 5 6 7 8 9 10 11 12 13 14 15 16 17 18 19 20 21 22 23 24 25 26 27 28 29 30 31 32 33 34 35 36 37 38 |
import { HttpErrorResponse } from '@angular/common/http'; import { Component, OnInit } from '@angular/core'; import { Owner } from './../../_interfaces/owner.model'; import { Router, ActivatedRoute } from '@angular/router'; import { OwnerRepositoryService } from './../../shared/services/owner-repository.service'; import { ErrorHandlerService } from './../../shared/services/error-handler.service'; @Component({ selector: 'app-owner-details', templateUrl: './owner-details.component.html', styleUrls: ['./owner-details.component.css'] }) export class OwnerDetailsComponent implements OnInit { owner: Owner; errorMessage: string = ''; constructor(private repository: OwnerRepositoryService, private router: Router, private activeRoute: ActivatedRoute, private errorHandler: ErrorHandlerService) { } ngOnInit() { this.getOwnerDetails() } getOwnerDetails = () => { const id: string = this.activeRoute.snapshot.params['id']; const apiUrl: string = `api/owner/${id}/account`; this.repository.getOwner(apiUrl) .subscribe({ next: (own: Owner) => this.owner = own, error: (err: HttpErrorResponse) => { this.errorHandler.handleError(err); this.errorMessage = this.errorHandler.errorMessage; } }) } } |
این logic، تقریباً همان logic فایل owner-list.component.ts است، با این تفاوت که اکنون ActivatedRoute اینجا import شده است، زیرا باید id خود را از route دریافت کنیم.
پس از اجرای تابع getOwnerDetails، میخواهیم آبجکت owner را با تمام account های مرتبط در داخل ویژگی owner ذخیره کنیم.
تنها کاری که باید انجام دهیم این است که فایل owner-details.component.html را به این صورت اصلاح کنیم:
|
1 2 3 4 5 6 7 8 9 10 11 12 13 14 15 16 17 18 19 20 21 22 23 24 25 26 27 28 29 30 31 32 33 34 35 36 37 38 39 40 41 42 43 44 45 46 47 48 49 50 51 52 53 54 55 56 57 |
<div class="card card-body bg-light mb-2 mt-2"> <div class="row"> <div class="col-md-3"> <strong>Owner name:</strong> </div> <div class="col-md-3"> {{owner?.name}} </div> </div> <div class="row"> <div class="col-md-3"> <strong>Date of birth:</strong> </div> <div class="col-md-3"> {{owner?.dateOfBirth | date: 'dd/MM/yyyy'}} </div> </div> <div class="row" *ngIf='owner?.accounts.length <= 2; else advancedUser'> <div class="col-md-3"> <strong>Type of user:</strong> </div> <div class="col-md-3"> <span class="text-success">Beginner user.</span> </div> </div> <ng-template #advancedUser> <div class="row"> <div class="col-md-3"> <strong>Type of user:</strong> </div> <div class="col-md-3"> <span class="text-info">Advanced user.</span> </div> </div> </ng-template> </div> <div class="row"> <div class="col-md-12"> <div class="table-responsive"> <table class="table table-striped"> <thead> <tr> <th>Account type</th> <th>Date created</th> </tr> </thead> <tbody> <tr *ngFor="let account of owner?.accounts"> <td>{{account?.accountType}}</td> <td>{{account?.dateCreated | date: 'dd/MM/yyyy'}}</td> </tr> </tbody> </table> </div> </div> </div> |
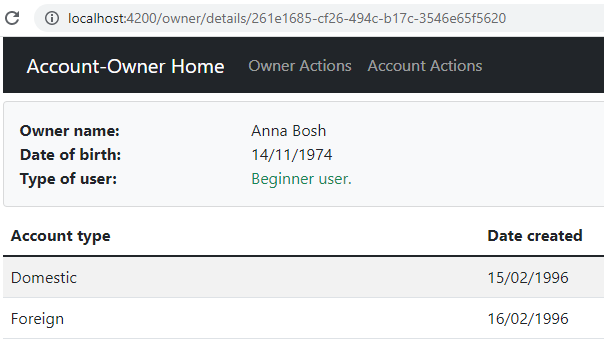
در اینجا، ما موجودیت owner را با تمام داده های مورد نیاز نمایش می دهیم. همچنین، اگر owner بیش از دو account داشته باشد، به صورت مشروط یک template متفاوت (advancedUser#) برای این فیلد نمایش میدهیم. در نهایت، ما تمام account های مربوط به این owner را نمایش می دهیم:

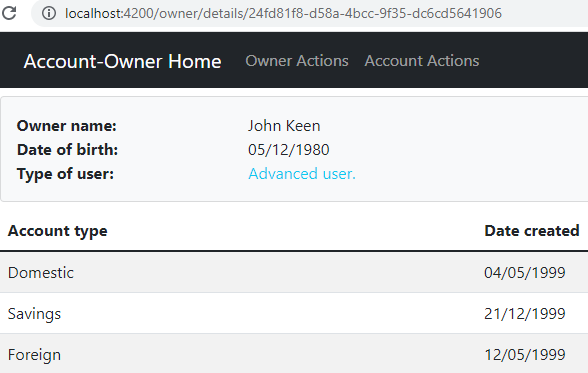
همچنین می توانیم نگاهی به کاربر advanced نیز بیندازیم:

نتیجه گیری
با خواندن این پست، یاد گرفتیم که چگونه با استفاده از مدیریت خطای Angular، خطاها را در یک service جداگانه مدیریت کنیم. همچنین برای نمایش داده های مختلف در صفحه با تمام جزئیات مورد نیاز، از HTML rendering به صورت شرطی استفاده کردیم.
در قسمت بعدی این آموزش گام به گام، میخواهم نحوه ایجاد component های فرزند و نحوه استفاده از Input ،@Output@ و EventEmitter ها در Angular را به شما نشان دهم. با انجام این کار، میخواهیم یاد بگیریم که component های خود را به بخشهای کوچکتر تقسیم کنیم (رابطه والد-فرزند).

